
Let’s review the technical aspects of creating a post. How can it be done in our WordPress editor? Sit back and relax. It’s easy. The description below is meant to guide a the first steps of a new member having no experience with WordPress-based websites.
- Step 0: Log in into The Biodiversity Alliance WordPress website.
- You have to be a registered Member on our website to be able to create a Post. After you logged in you will see a narrow black strip on the top, and a wide one on left of your browser window with various menu elements.
- Step 1: Add a New Post
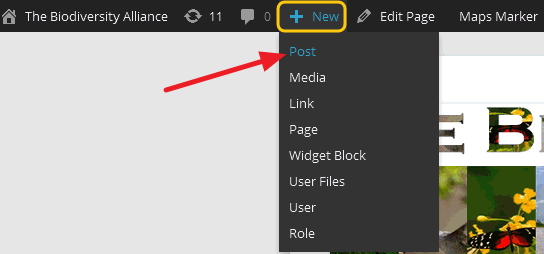
- Either drag your cursor on the top strip over the ‘+ New’ element and select ‘Post’ from the appearing menu, or click on ‘Post’ on the left side strip and select ‘Add New’.
-
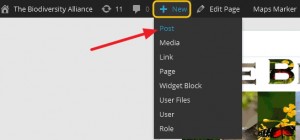
GPP II-1 Add New Post – a
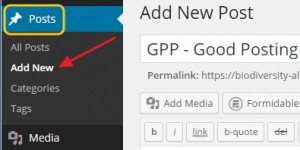
GPP-II 1 Add New Post – b
- Now you will see the ‘Add New Post’ editor with several things around but you need to focus only few of them. First of all make sure that the ‘Text’ editor is active, not the Visual one (so if you hover your cursor over ‘Text’ it remains gray and does not change to blue with highlighted white background).
- Step 2: Select an attractive title
- It sounds to be trivial but it isn’t. A good title is a one which rises the reader’s interest. From information theory viewpoint the lesser the probability of the event or occasion suggested by the title is, the higher the chance to raise interest. Sounds complicated. Let’s consider a title ‘The Sun will set today’. The probability of the event is almost 1. It has never happened otherwise. Boring. ‘The Sun will not set today’ seems to be more unusual, and more likely to catch attention.
- Step 3: Create the body of your post
- You can type in your text into the editor window but it is sometimes more convenient to craft your text in a separate text editor outside of our website, and when you are done just copy and paste it into the WordPress editor. WordPress also has a spell checker built in which helps spotting typos.
- Step 4: Inserting links (optional)
- If you are referring to other web content in your post you might want to insert a link pointing to that piece of content. This can be done in an elegant way. Inserting just the web address as a non clickable link is not that elegant. Instead you can have an appropriate title or any word you wish to use, and you can add a link to it.
- Step 4-1: Copy the link into your clipboard
- If you want to refer to an article on another portal, open a new browser tab or window, go to that article and in the address bar select the link and hit CTRL-C. I used to copy the link into my draft to keep it together with my text before I start creating my post in WordPress.
- Step 4-2: Select the word(s) to add a link to
- You might want to use the same title what your link is pointing to or anything else you think appropriate in your text. Select the text you want a link to add to.
- Step 4-3: Activate the link editor
- Click on the ‘link’ button, the 3rd one normally, right above your editor window. You will see a small windows popping up with which you can edit and customize your link.
- Step 4-4: Copy the link from your clipboard
- Copy the link from your clipboard into the upper text box labelled URL in the popup window.
- Step 4-5: Add a title to the link
- The title of the link will be shown when the reader of your post hover the cursor over your link. It is good to try to be consistent especially if you are posting frequently. I used to put the name of the source at the beginning of the title, such as ‘wikipedia’ or ‘The Guardian’ and after a colon comes the subject.
- Step 4-6: Select ‘New Window’
- By selecting the ‘New Window’ you tell the browser to open a link in a separate browser tab (or window) when the reader clicks on it. It is important because this way the window with your post remains open and the chance that the reader will continue reading and perhaps commenting it is higher.
- Step 4-7: Add your Link
- The last step of creating your wonderful link is completed by clicking on ‘Add Link’ button.
- Step 5: Preview your post
- At any point in time you can check and see your shaping post by clicking on the ‘Preview’ button on the right side widget titled ‘Publish’.
- Step 6: Publish your beautiful post
- When you are done just click on the blue ‘Publish’ button in the lower right corner of the ‘Publish’ widget. In that widget you can see few other properties, just leave them on their default values.


GPP-II 1 Add New Post – c

GPP-II 2 Choose attractive title
GPP-II 4 Copy the URL to your clipboard
GPP-II 4-2 Select the text to add a link to
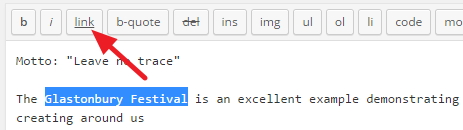
GPP-II 4-3 Activate the link editor
GPP-II 4-4 Copy URL into the upper text box
GPP-II 4-5 Add Title to the link
GPP-II 4-6 Select new window checkbox
GPP-II 4-7 Finish by click on Add Link
GPP-II 5 Check your draft with Preview
With the above six main step you created your great post. Congratulation!
The 3rd piece of GPP series I’ll show some housekeeping practice with which we can keep all of our posts consistently nicely.